
A DJ's guide to digitising vinyl, by Chrissy
San Fran-based DJ and producer Chrissy outlines his guide for ripping vinyl so they sound full, loud and powerful on a club system. With tips and tricks around needles, preamps, turntables, software and file formats, it's a go-to guide for anyone who wants to digitise their record collection
Recently I've had several people ask me about my process for ripping vinyl. As a DJ and record collector who LOVES vinyl but HATES carrying heavy boxes, I've ended up ripping my entire collection to play at the club. It's time-consuming but worth it, especially when I get to hop on the CDJs and play some secret, slept-on, vinyl-only, proto-house classic that no one else has digitally.
There are a LOT of variables when digitising vinyl, and it can be daunting. After several thousand records worth of trial and error, I've worked out a system that I think achieves great-sounding results, especially for dance music. There are a lot of other valid setups for ripping vinyl, but hopefully taking a look at my process will help others get started, or help to work out some of the kinks in their setup.
- A turntable
- A cartridge and stylus
- A phono preamp
- A computer
- An audio interface
- Some sort of record cleaning setup
- Audio editing software
If it's available online as an AIFF or WAV, don't bother ripping it. Just get the digital file. It's way less work, and it will almost always sound better than a vinyl rip. I say "almost" because there are occasionally vinyl rips and wildly over-compressed remasters lurking on digital sites, but 95 percent of the songs you get from Bandcamp, Beatport, JunoDownload, or Traxsource are going to sound better than a vinyl rip.
Likewise, before you digitise your vinyl, look on Discogs to see if any of the songs you want were ever released on CD. You'd be surprised how many rare tracks got licensed to compilation CDs that are now available online for pennies.
And remember: the best thing you can do to get a good-sounding vinyl rip is to have a good-sounding record. Spending $10 on Discogs for a Mint condition copy to replace your VG- is going to yield more impressive results than spending thousands on fancy audiophile equipment. This brings us to...
If you're a DJ, you probably have Technics SL-1200s, SL-1210s, or something similar. This will work great, as long as your turntable is in good working order. You could always plunk down a bunch of cash for a fancy audiophile turntable, but the difference in sound quality is going to be almost imperceptibly small. Also, if you're anything like me, you'd rather spend that money on more records.
However, if you have a cheaper entry-level turntable — like a Crosley or an all-in-one turntable/stereo combo — and you have the money to upgrade, I'd consider upgrading.
Whatever turntable you're using, make sure it's calibrated correctly. Set the arm height, tracking, and anti-skating according to the manual, and make sure the ground wire is connected, if applicable. If you still have the heavy rubber mat that came with your turntable, use that instead of your DJ slipmat. It will help dampen outside vibrations and give you a cleaner, quieter recording. I also really like the suede turntable mat from Hide In The Sound, which helps reduce dust and static, thereby reducing pops and clicks during playback.
The stylus, or needle, is the part of the record player that actually makes contact with the record's grooves and transmits their vibrations, and the cartridge is what converts those vibrations into an electrical signal. They are usually sold together as one piece, and picking the right one can feel overwhelming. There are hundreds of cartridges on the market, with prices ranging from $30 to over $10,000.
As a DJ, I've always sworn by the Ortofon Concorde Nightclub cartridge with the Nightclub Elliptical stylus. I love this cart for its sound, but also for its great tracking, ease of installation, and consistent manufacturing quality. I recently bought an Ortofon Super OM20, which is a ‘nicer’, more expensive cartridge and stylus, but I find that I still prefer the sound of the Nightclub. It sounds a teensy bit punchier and more lively, which is exactly what I want with dance music. A lot of the high-end cartridges and styli are designed for audiophile jazz and classical listeners, not amen breaks or 909 kicks. Dance music 12-inches were made to be played on DJ-grade needles and decks, and in my experience, they often don't sound quite right on the fancy high-end stuff.
Another point about needles: some records sound nearly identical when played on different needles, but others can sound remarkably different, especially if they're in poor condition. Pops, crackles and groove wear might show up more with one stylus than another, based on the shape of the needle and where it sits in the groove. Even though I prefer the Ortofon Concorde Nightclub stylus, I like keeping the Super OM20 around for this reason.
Regardless of what cartridge and stylus you pick, the most important thing is to make sure it's installed correctly. Some cartridges can plug into the tonearm very easily, whereas others will need to be connected to a headshell and calibrated with a stylus protractor. Make sure to set the stylus to the recommended tracking weight (the cartridge packaging will let you know the correct value, and your turntable's manual will explain how to set it). If a record sounds a little distorted or raspy, or if certain bass tones cause the needle to skip, you might be able to improve that by slightly changing the tracking weight in either direction. Don't be afraid to experiment — make a short recording of each different setting and see which one you like better.

"As a DJ, I've always sworn by the Ortofon Concorde Nightclub cartridge"
For the cleanest possible recording, you need the cleanest possible records. Some of the noise on a worn-out record comes from worn-out grooves, but a lot of it comes from dust and dirt trapped in the grooves, as well as static electricity. I wash my records with Groovewasher G2 cleaning fluid and a Groovewasher record brush, followed by a spritz of distilled water wiped away with an anti-static cloth (like the ones used to clean eyeglasses). Make sure you wipe in circles (along with the grooves, not perpendicular to them). Finally, I shoot the record with a Milty zerostat anti-static gun, which helps reduce static. Just like with turntables and needles, you can spend $50, or $500, or $5000 on this step. There are some very pricey record cleaning machines out there that get better results than my setup, but in my experience, the difference doesn't justify the cost.
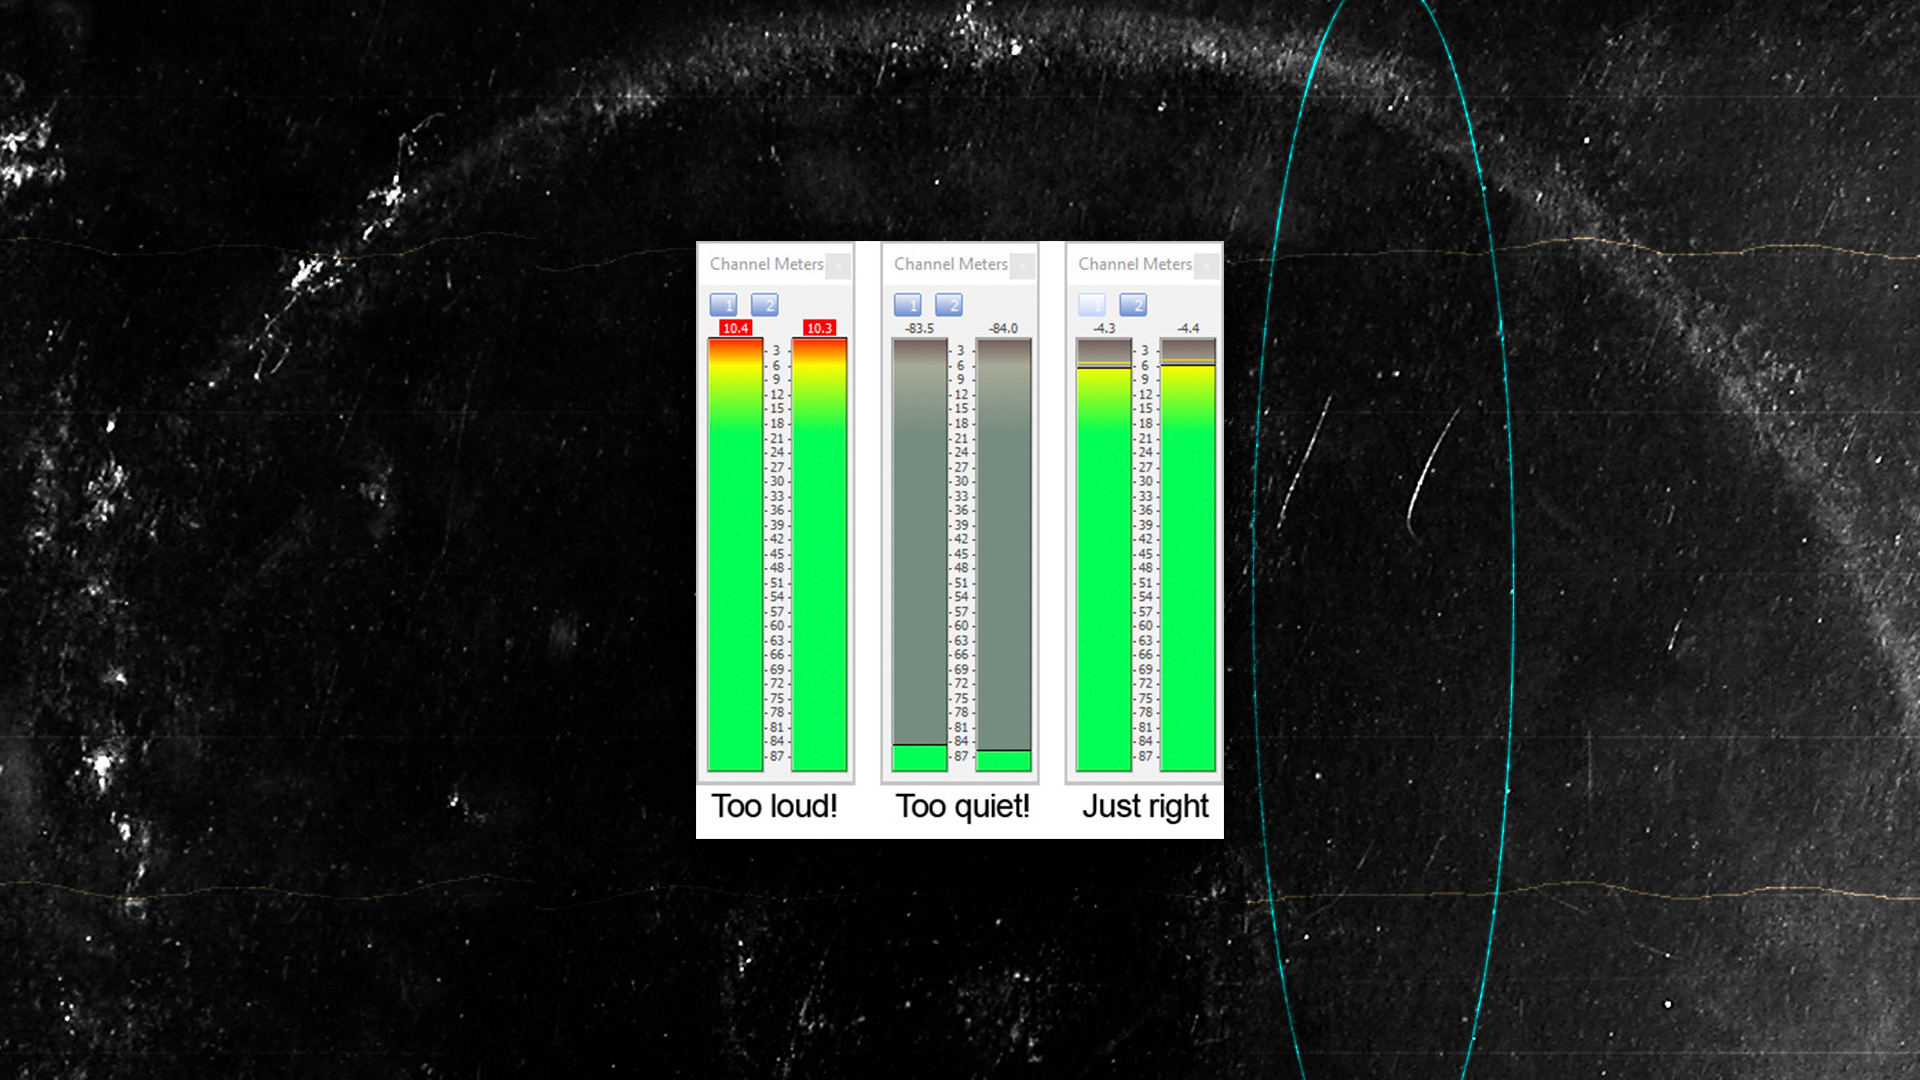
You want to set the recording level loud enough that you get a good signal, but quiet enough that there's no risk of clipping (aka distorting, or going ‘in the red’). Start recording, put the needle on the record, and back away slowly — try not to bump into the turntable or stomp around too much until it's finished!
Here's where we get to the world of phono preamps and audio interfaces.
A phono preamp is what amplifies and EQs your turntable's signal, turning it into something that can play over your speakers. DJ mixers and home stereo receivers usually have built-in phono preamps, but there are standalone models as well. I think a good standalone model is the best choice for vinyl ripping, but if you have a nice DJ mixer that you like the sound of, you can use that for this step.
An audio interface is what lets you run the audio from the phono preamp into your computer. It usually has RCA (red and white) audio jacks and a USB jack on the front or back panel. Some computers, DJ mixers, and even turntables have built-in audio interfaces as well.
I happened to have a Serato SL4 box sitting around, which works as a phono preamp and an audio interface, so I use that to rip vinyl. The Serato SL4 has recently been discontinued, so you might be able to find one cheap (but make sure it's compatible with your computer before buying). I think the Rane preamps and converters on the SL4 sound pretty good (especially compared to previous Serato models, which I wouldn't recommend). There are cheaper options that will work great, and also much nicer options if you have thousands of dollars to spend (are you noticing a pattern yet?) Get what you can afford, and don't stress out about it too much.
Next, you'll need some software to record and edit the sounds coming into your computer. I use Magix Sound Forge Pro, but Audacity is a free option that does basically the same thing. You can also record the audio with a DAW like Ableton, but you'll still need an audio editor like Sound Forge or Audacity for the next step.
Once you've got your turntable plugged into your phono preamp, your phono preamp plugged into your audio interface, your audio interface plugged into your computer, and your recording software fired up, you're ready to go! Put on a record, and look at the audio meters in your recording program (as well as your DJ mixer, if you're using one).
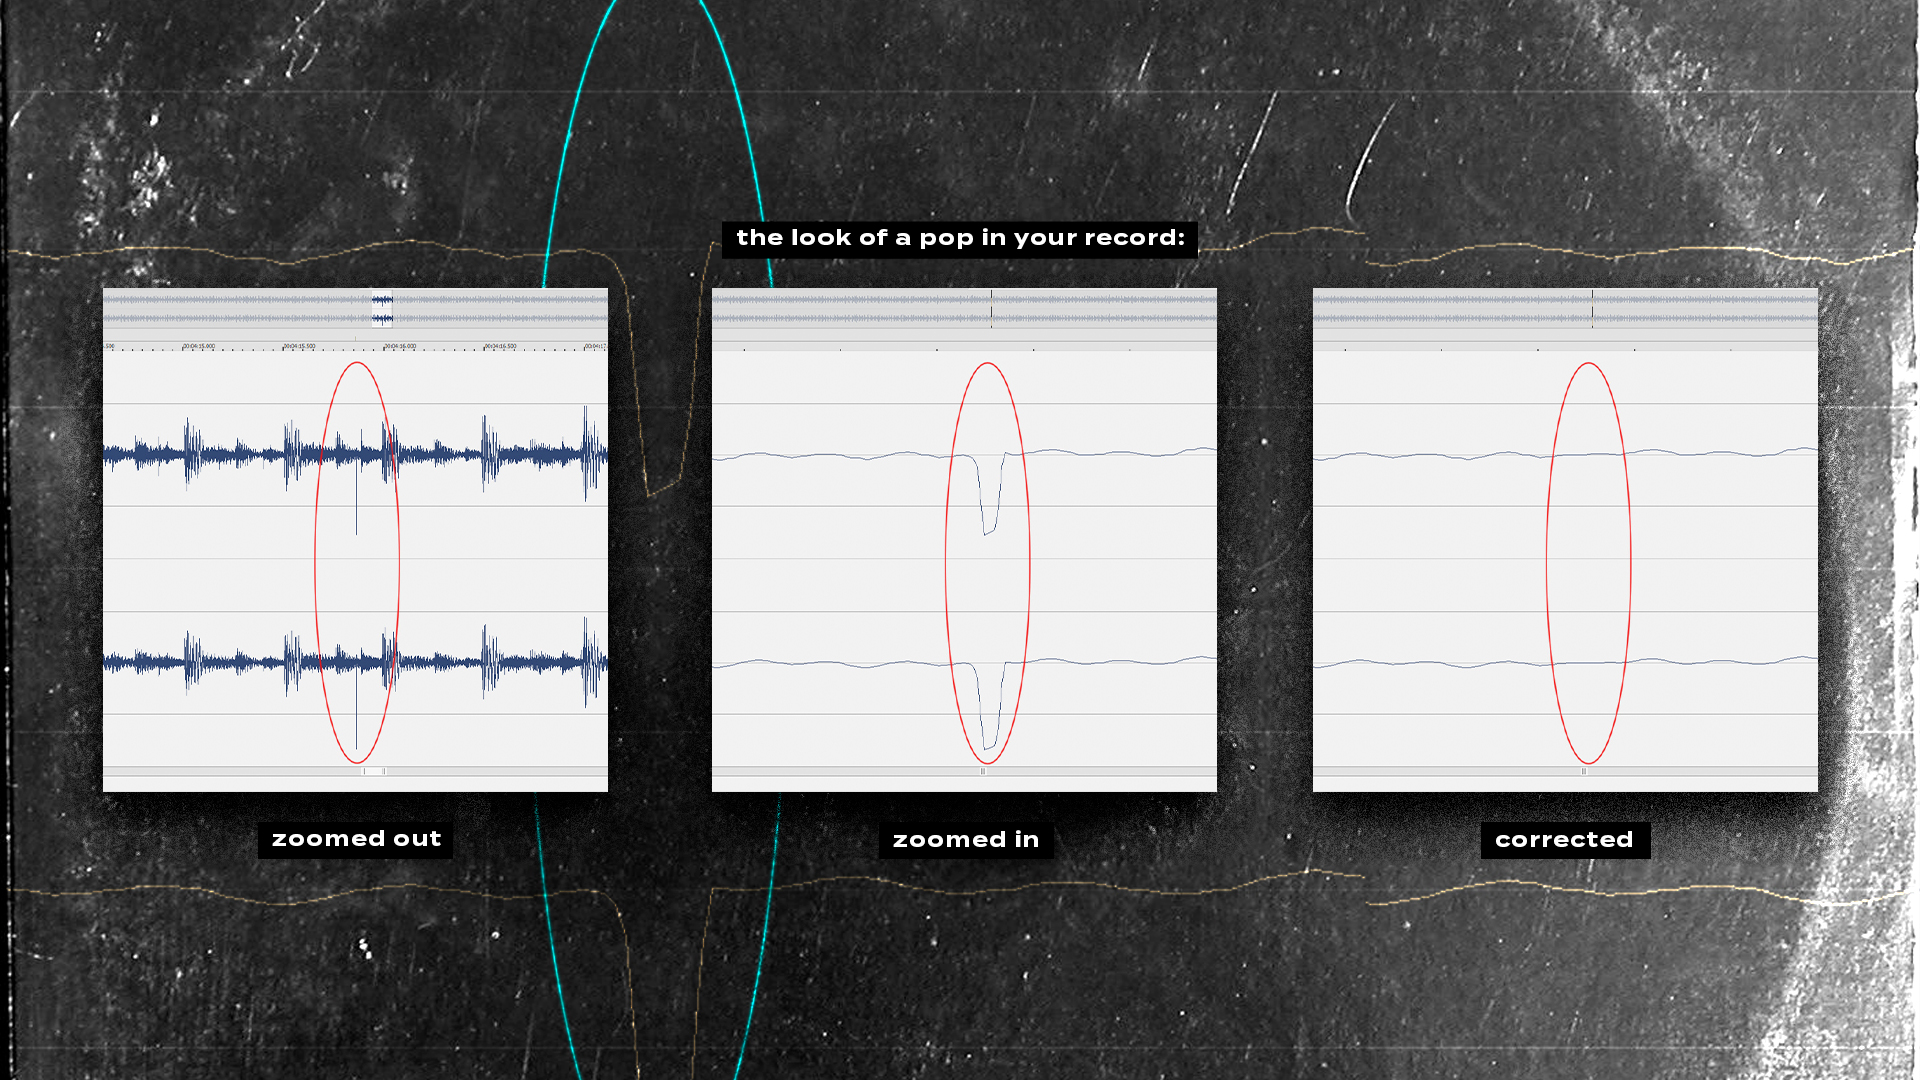
Once your record's done and you've stopped recording, you'll need to edit the file. Select and delete any dead air at the beginning and end of your file. If there are multiple songs on the side you just recorded, you can select each song individually and copy/paste it to its own individual file. If there are any pops and clicks on your recording, you can remove those now as well: go to the part of the file where the offending noise is, and zoom in. You should see a spike in the waveform, where the normally gentle curves are suddenly interrupted by a jagged shape. Highlight that jagged bit and draw over it to approximate what you think the waveform should have looked like, or mute it altogether. There's a little bit of guess-work involved in this, so make sure to listen back and check what you've done.
There are ‘vinyl restoration’ programs that can automatically remove pops, clicks, and surface noise, but I advise against them. I think they affect the sound quality of the recording too much. They shave off a lot of the treble, and they can make punchy kick drums sound weak and flabby. They also miss a fair number of pops and clicks altogether. Maybe in the future, these programs will improve to the point of being worthwhile, but as of this writing, I don't think they're good enough.
Once you've taken out all your big pops and clicks, find the ‘Normalise’ option in your audio editor, and Normalise the file. This boosts the volume of the file as loud as it can be without distorting. It won't sound quite as loud as a song that has been mastered for digital release, so you might have to boost the gain knobs on your DJ mixer when you playback your vinyl rips in a club. You can also apply EQ at this stage if you want, or compression to boost the volume even louder, but make sure to save a copy of the original normalised audio with no EQ or compression, just in case you decide you don't like the changes you made.
"Some of the noise on a worn-out record comes from worn-out grooves, but a lot of it comes from dust and dirt trapped in the grooves"
There are three choices to make when saving your audio file. There are whole books on this, so I'll keep it as simple as possible.
- File Type: This means AIFF versus WAV versus MP3. It's like the language the computer uses to encode the audio.
- Sample Rate: Think of the waveform of your song like a connect-the-dots puzzle. When the computer draws the waveform, the Sample Rate tells it how many dots per second to use. More dots = a more nuanced, truer looking (and sounding) waveform.
- Bit Depth: Each dot of the waveform represents the volume at that exact point in time. Bit Depth determines how precise each individual volume measurement can be. The volume knob on my stereo goes from one to 10, but the volume button on my TV goes from one to 100, and bit depth is kind of the same principle: more possible values = a more precise measurement. For 8-bit audio, the ‘volume knob’ has 256 notches. For 16-bit, it has 65,536, and 24-bit has 16,777,216!
When choosing a file type to save your vinyl rips, AIFF is the best option. It's lossless (i.e. it keeps the exact same audio quality as your original recording, instead of compressing it and losing quality like an MP3 or AAC). It also supports metadata (unlike WAV files), which means that when you edit the artist and song info in your music library software, all that info becomes part of the file itself, and comes with the file when you move it to a new program or a new computer. Finally, AIFF files are supported on every model of CDJ (unlike FLAC files, for example).
As for sample rate and bit depth, I prefer to save my files with a sample rate of 44,100 (44.1k for short), and at 16 bits. This is the same audio quality as CDs and most lossless digital files, and you sometimes see it abbreviated as 44/16. This kind of audio also works with every model of CDJs.
Some people prefer even higher audio quality, and they might save their files at 48/24, or 96/32, or some other combination of sample rate and bit depth. These files might play on newer CDJs, but they won't work on older models. I personally don't think it's possible to tell a difference between 44/16 and higher sample rates/bit depths, and I value the versatility and compatibility of 44/16 files.
Now that you've saved your file, you're good to go! Load it into rekordbox, Serato, or whatever you use, input the artist and song info (there are numerous programs that will do this part for you — mp3tag is a good free option).
When you buy a WAV or AIFF file from Bandcamp and the CDJ says ‘Unsupported File Format’ when you try to load it, that's usually because it's the wrong sample rate or bit depth. Now that you have an audio editor, you can fix this too! Open the file in your audio editing software and look at the sample rate and bit depth (usually this is in the file properties). Resample to 44,100 (if necessary) and/or convert bit depth to 16-bit (if necessary). Always make sure to do the resample step first, and the bit depth step second. Save over the file, export the new version to your USB, and it's fixed!


